
I
first got into home theater when I was in high school in the late 90s, when the
DVD was brand new, and 5.1-channel audio was mind-blowing. My first system was
composed of all Sony gear, purchased at Best Buy, and it made my mom’s basement
the place for watching movies. My friends and I crowded around my
hilariously small 20-inch Sony Wega TV and had a blast. The screen size left
something to be desired, to be sure, but my friends thought that the audio
experience was incredible. Thanks to my habit of inhaling every audio and home
theater magazine at the local bookstore, however, I knew that my system was far
from end-game. Rather, it was just a starting point on my journey. Before long,
I got the upgrade itch, and even though I didn’t have the money for new gear, I
wanted to see and hear what else was out there. My home town of Greensboro,
North Carolina didn’t have any proper Hi-Fi or home theater stores, and Best
Buy had lost its appeal. My friend Drew had a legit stereo at his house, which
his dad Tom had bought in the 80s — Vandersteen speakers and PS Audio electronics.
Tom directed us to Audio Advice in Raleigh, which carried several of the
storied high-end audio and home theater brands that I had only read about. My
friend Lauren was the only one in our group with a car roadworthy enough to
make the 90-minute schlep, so we piled into his old Volvo station wagon and
took off. I must have gone dozens of times over the years, not only because of
all the great gear available to audition, but also because the people there
never made me feel bad about wanting to learn about, and listen to, gear that I
clearly couldn’t afford. Now, years later, Audio Advice has teamed up with
Audioholics, and I couldn’t be happier to recommend the store to our readers.
I’ve been recommending it to friends for years.

One
of the coolest features of the Audio Advice website is a free, patent-pending
Home Theater Designer Tool, which designs your dream theater right before your
eyes as you enter information like room dimensions, speaker layout preferences,
and ideal viewing distance. You can choose how many rows of seating you want,
what type of projector and screen, and whether your speakers will be visible or
hidden in the walls and ceiling. The tool makes it easy to visualize how
everything will look and offers helpful hints if you don’t know exactly what to
choose. The tool can do complex calculations in real time, and tell you the
optimal screen size, seating locations, and speaker locations for your room. At
the end, you can save your design to receive customized measurements for your
layout. Then you can work with Audio Advice’s staff (via chat, email, phone, or
in-store) for final optimization of the details, including individual product selections, room acoustics treatment, and more.
But you can use these online tools for free even if you don’t end up buying
anything from Audio Advice! Audioholics founder Gene DellaSala recently
discussed this invaluable tool with Scott Newnam of Audio Advice on a video livestream.
Audio Advice talks about their NEW Home Theater Designer
Projector Calculator – Finding the Throw Distance, Screen Size & Positioning Made Simple
Here’s
a brief run-through of how to use the Home Theater Designer Tool and the related
Projector Throw Distance Calculator. First you need to measure the dimensions
of your room and enter that information by moving the sliders to adjust the
tool’s virtual room. Next comes the seating section, in which you add however
many rows of seating you want, and the number of seats per row. If you select
two or more rows, additional sliders will appear to let you change your riser
height and depth. Choosing which row you want as the “primary row” will allow
the system to maximize performance for this row. Next, set the distance between
the seats and the screen by using your mouse to move the seats, or by moving
the slider control. You can also set the position and width of the aisle. After
seating comes video setup, which begins by asking whether you are using a
projector or a TV. If
you select projector, you’ll be asked to input the brand and model, assuming
you already have one picked out. If not, you can tell the tool to continue
based on a nonspecific generic projector. Here’s where the Projector Throw
Distance Calculator comes in. It will determine the ideal throw distance,
projector placement, screen size, and screen gain in your home theater, based
on your individual plan. This is a helpful tool even if you aren’t designing a
whole home theater from scratch. Maybe you’re considering making the jump from
a TV to a projector in your living room, or maybe you’re replacing an older
projector in an existing home theater space. In any case, this tool relies on precise data from Audio Advice’s in-house lab
tests to help you get exactly what you need for your space. The tool will help
you choose the aspect ratio, size, and gain of your screen, based on which type
of content you watch most, and your desired immersion level.
Each
selection has a pop-up with a detailed explanation of that item, so even
beginners feel like home theater pros. If you do want a more detailed
explanation, the Audio Advice website also has incredibly helpful articles that
provide a deep dive into various topics, including how to choose the best screen, what size screen is right for you, and the differences between aspect ratios. If you’re new to home theater, you
can figure out what your preferences are based on where you like to sit in a
commercial theater. For example, if you like to sit in the middle of the
theater and you choose a 16:9 ratio screen,
you’ll probably be comfortable with a 30-degree field of vision. With a 2.40
widescreen, a 42-degree field of vision will probably work for you. But if you
sit closer to the front in a commercial theater, you might prefer a 36-degree
field of vision for 16:9 and a 48-degree field of vision for a 2.40 screen. The
desired field of vision, combined with the viewing distance, will determine the
ideal screen size. The online tool makes all of these complicated calculations
unbelievably simple. When the tool has determined an ideal projector mounting
location for your room and screen, you can see how bright (in nits) a specific
projector will be in your theater. If the resulting brightness is fully HDR
compatible, the indicator light turns green. If your selected projector isn’t
bright enough, the indicator light turns yellow. You can move the projector
forward and backward using the slider (or your mouse) to see how various
viewing distances impact the resultant brightness. You can also try this with a
number of different projector models.
Choosing Your Speakers & Locations Made Simple
Once
the video portion of your theater is perfected, you move on to audio. If you
aren’t sure what loudspeaker layout you want, you can start by reading this detailed article about speaker layout options. The tool starts by asking whether
you want in-wall or box speakers. If you choose in-wall speakers, you can
choose to place your front speakers behind an acoustically-transparent screen.
You can select whether you want to employ rear surround speakers, front wide
speakers, and any number of height effect speakers and subwoofers. If you
remove speakers or relocate seats, the tool automatically moves all the
speakers into their new optimal positions. If you manually move a speaker into
a location that won’t work properly, it will turn orange, indicating that it is
out of spec. You can then make adjustments until its color returns to normal,
indicating that you’re good to go.
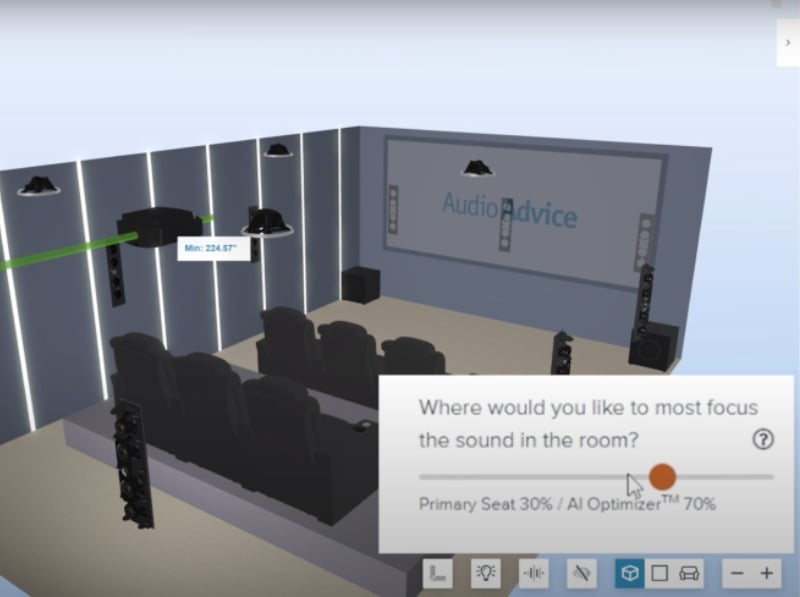
One
of the biggest challenges in theater design is to strike a balance between a
layout that delivers absolutely perfect results in the main listening position
and one that maximizes the performance across all seats. Audio Advice’s
proprietary AI algorithm addresses this in a unique way, and you can visualize
the sonic results of your setup by turning on the sound dispersion button.
According to Audio Advice, “Most people will want to shift as far to AI
optimized as possible until just before speakers turn orange to achieve the
best performance for all seats while still 100% in Dolby spec for the primary
listening position.”
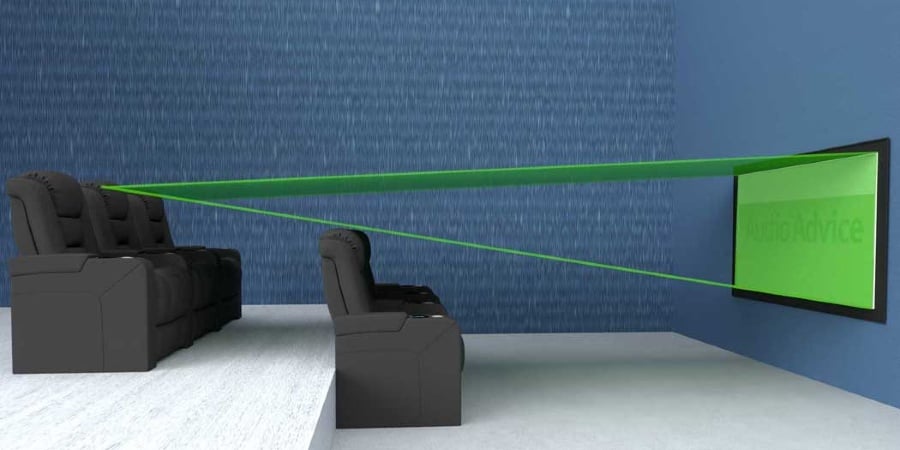
At
the bottom of the tool you’ll see a set of other buttons, including a ruler
showing you the main measurements as you build, a sightline button showing you
how screen height is automatically adjusted for optimal viewing from all seats,
and view buttons that allow you to see how the screen looks from the primary
viewing seat and how the room looks from various other angles. When you save
your design, you have the option to review it with an Audio Advice expert to
make sure you have the best possible results. You can also get a printable
version of all measurements, including the height of the screen, the locations
of all the speakers and seating, and even the pole length you need for your
projector. If you’re having Audio Advice install your home theater, you can
work with the store’s staff to pick out each product individually, or just
explain what kind of experience you want and leave the particulars up to the
experts. If you’re doing everything on your own, the website is full of helpful
how-to videos, guides for design, guides for product selection, and a fantastic Image Inspiration Gallery.
To
try the Audio Advice Home Theater Designer tool for yourself, click here.
If
you just need the Projector Throw Distance Calculator, click here.
Have you used these tools to design your home theater? Share your experiences in the forum thread below.
gene posts on November 23, 2022 03:24
58769
Read: Home Theater Designer Tool
We sit down with Scott Newnam of @Audio Advice to discuss their projector calculator and home theater design tools that can help you design the best listening and viewing space possible. Learn how you can use these invaluable tools to design and optimize the best home theater possible. 1) Projector Calculator: Audio Advice tested the major projectors in their lab and use that data to show projector throw distance, fan noise level, vertical and horizontal offset, etc. Like the Home Theater Design Tool, they’ve made it super easy for anyone to use. It is already being used by a lot of home theater installation companies who want to quickly figure out where to put the projector. 2) Home Theater Design tool now has front wides and we they made a killer slider that allows designers and users to choose anywhere between optimizing for one seat versus across all seats. This is really super cool to show as you can see how it moves the Atmos and other channels as you slide it. They also have pulled in the projector calculator capabilities from that tool into this one so that if you are designing from scratch it does everything for you.
pYYWzogvIh8
Read: Home Theater Designer Tool


Leave a reply